

Typically, hot knives have a blade connected to 2 poles of an encased transformer. When a current passes through the blade, resistance causes it to heat to the desired temperature. Hot knives that are designed for field use when no source of electricity is available are usually lower temperature devices powered by a butane flame that heats the blade and allows it to cut and seal the material.
Setting up your Hot Knife for the first time
When you receive your new hot knife, mount the blade to the posts and tighten. When the knife is turned on for the first time, there may be some smoking while the manufacturing oils burn off. Leave the knife on for about 20 minutes and turn it off. After it cools, check the tightening screws on the posts and retighten if necessary. Your knife is now ready to provide years of trouble free service. Check the tightening screws periodically to ensure good contact with the posts.
Hot Knives should always be used in a well ventilated area to avoid inhalation of the fumes.
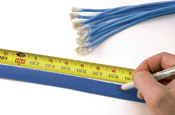
Measure your Sleeving
Mark the cut line with a pen or marker.
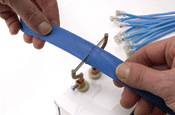
Cutting with the Hot Knife
Always cut in a well ventilated area and avoid inhaling the fumes from the melting material. Both the blade and the cut ends of your material will be HOT. Be careful.
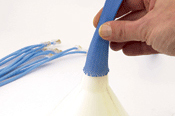
Flaring the ends
While the cut ends of your sleeving are still hot, use an inverted funnel (needle nose pliers or scissors also work well) to form the end into a soft flare. This will allow the sleeving to easily slide over your application and accommodate plugs or connectors without binding or pulling.
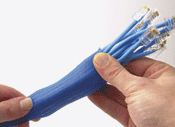
Installing the Sleeving
Fragen? Wir sind für Sie da


